PROCESS: MUNN, AFTER LOSING
Part 1 - The boring, inspirational part
I started working on this to prove to myself that I could still make art with my hands, without Photoshop and After Effects.
I have always been a fan of collage, and keep a pretty big trove of images, postcards, magazines and other paper bric-a-brac in a shopping bag under my bed, all intended to be used “one day” as art, and not just as food for the thriving colony of silverfish that live under there.
So I traded in my Command C for a decent scissor, and experimented with a whole different sort of Command Vs until I found the right one. (Elmer’s Glue Stick by the way.)
Oh, and I traded in Command Z for the words “fuck” and “shit” a whole bunch.

Ultimately I learned the lesson again that mistakes are good and desirable, as long as you don’t run away from them and instead turn them into your strengths. It’s funny how hard that is to remember in Photoshop. Right?

Anyway, for a few weeks I made a collage every day and some of them turned out pretty well. I felt good about myself and vowed to do it again some day soon.
End of story. I donated the collages back to the silverfish and incorporated the lessons into my digital bag of tricks.
Part 2 - The boring, technical part
I saw the collages a year or so later, and surprisingly I still liked a few of them. I pretty much knew I wanted to animate them as soon as I saw them. But because it was going to be non-client work, I wanted to experiment and try something I had never done before.
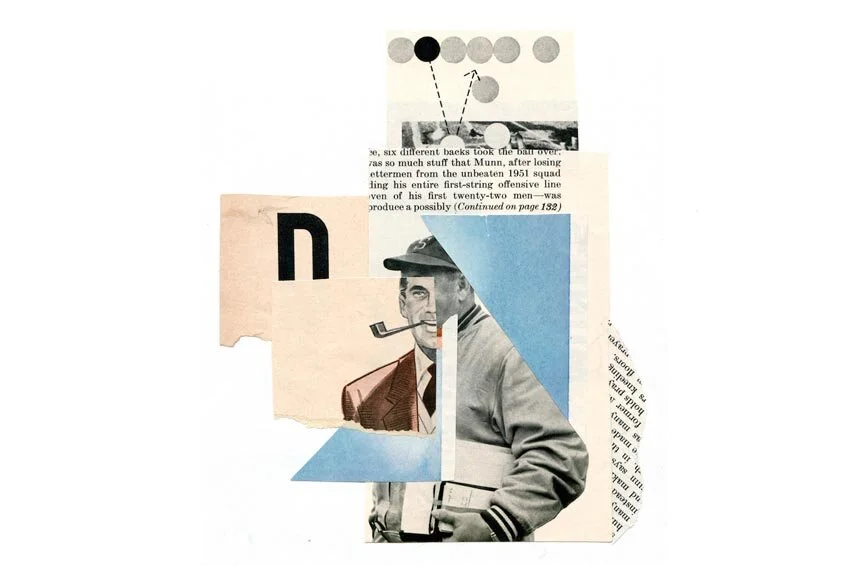
The original collage I made on paper. Also, wonderfully, the unexpected source of the title. Accidental automatic process at work.
To start, I decided that it might be fun to try and animate the entire collage with one Null Object, so I could turn off all of the other layers and just work in one spot. One master controller, rigged to animate all of the different collage layers with the properties and effects that I might want.
One null to rule them all.
For anyone who has spent time rigging characters in AE, this is a pretty standard idea. It’s not uncommon to make a null, put a bunch of expression sliders and angle controls on there, and then connect the various properties of your layers to those controls and animate everything using that one rig.
But I had never approached non-character layouts with that kind of tool. Maybe everyone else always does this, I don’t know … but this was a first for me.
My approach here was particularly based on experiences I’ve had rigging faux 3D, parallax-style head turns with puppet characters. But because I wasn’t using the rig to animate something with clearly defined spatial boundaries, like a head or a body, it gave me a lot more flexibility to push the edges of the tool and make it work in unexpected ways.

Some faux-3D head turns I rigged up for a project
I went pretty far down the rabbit hole, adding in functionality that I didn’t even wind up using, just because I got so into the idea of creating additional animation possibilities. But the biggest challenge came trying to figure out how to add variable multipliers for each collage layer that I could control individually with sliders.
In a faux-parallax rig, one way to move the objects in variable ways is to include a multiplier in the code. The higher the multiplier, the greater distance the layer moves when the controller moves. A multiplier of one returns no movement at all (1 * x = x), and a negative multiplier moves the object in the opposite direction of the controller.
Generally you set those multipliers and then leave them alone, because you always want the nose to turn X% more than the left ear, or whatever. Put another way, you want the controller to exert a consistent amount of influence on each part, based on that preset relationship. But in this case I wanted the opposite -- the ability to animate the multiplier influence for each collage layer individually.

In the end I cheated and used two controllers, just to make it visually easier to comprehend. I made a Values controller, with the sliders for each collage layer on there (as well as checkbox controls so I could animate the layers on and off manually) and a Control null where I animated all the properties.
One great function of this kind of rig is that you can always dial all the sliders and controls back to zero, resetting the artwork back to the original values for each property.

Thanks for checking this all out, and if you make something using this method let me know!